Showing posts with label home decor. Show all posts

Tuesday, 5 March 2013

Work in progress - Granny Square Blanket

The amazing throws and afghans made by tweeters and bloggers I follow always impress and shame me. I've been crocheting for about five years now and, despite not touching a hook at all for  three years in the middle of that time, I really feel I too should have a home full of pretty, jewel-coloured, welcoming, handmade blankets.  In my early days of crochet, I did once make a blanket. It was simply an enormous granny square in bottle green and I used it to cover one of the hideous armchairs in the rented flat I lived in at the time. Presumably, I left the blanket in said flat, as I've never found it since.

Previously deterred from making a proper, full-size, grown-up blanket by the knowledge that my fickle nature and short attention span would soon see it abandoned and forgotten, I decided to just try and give it a proper go. 

I'm just going to hook up a few squares whenever I have a bit of spare time but I'll keep doing all my other projects as usual to stave off boredom. 


Have you got any tips on staying motivated on a large project?  If you've made a knit or crochet blanket, how long did it take you? 

                                                                             Jenny
                                                                                 x


Wednesday, 13 February 2013

(Almost) Instant Wall Art

Ingredients:

A Sunday morning
1 or 2 old episodes of Friends
A cup of tea
Large handful of buttons
1 x artists canvas
A few drops of PVA glue


Sometimes the simplest crafts are the most rewarding!

Jenny
x

Monday, 11 February 2013

Pro-craft-ination - Lamp Makeover


As well as running my own little shop, Bluefinch Boutique, I'm a freelance writer.  I work at home from my little office or, if that's too messy, the kitchen table.  As I'm trying to expand my client base and get together a decent portfolio of writing at the moment, I sometimes have to work on briefs that may not be exactly in my area of expertise and it can take a while to think of an angle for my article.

I'm trying not to turn anything down at the moment as a) it's all experience, b) you never know which unlikely little jobs might lead to bigger and better things, and c) I have a serious addiction to bamboo yarn, I love holidays and I need a new bathroom.

I love writing and once I get started on an article, the words generally flow with ease. Before I can actually sit down and get to that point, however, I tend to procrastinate in crafty fashion.  Generally, I'll be idly looking around the house when my eyes will land on something and I'll think "Oh, I'll just quickly paint/strip/cover/mend that before I get started on the writing" and before I know it, it's 2pm and I've forgotten to have breakfast.

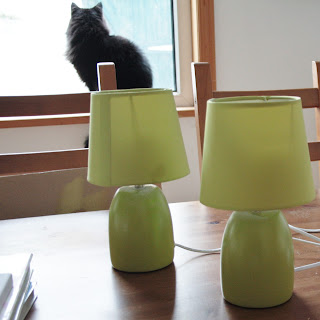
These ugly little lime-green lamps had been sitting in my bedroom for a few months.  I used to have two really pretty white lamps in there but somehow they both got broken.  I actually bought these as a temporary replacement at a ridiculously low price but they outstayed their welcome so, sick of waking up to them, I gave them a quick makeover:

lime-green lamps....non
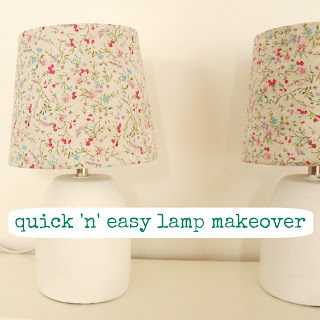
white and florals...oui
I painted the bases in white acrylic paint, adding a layer of clear varnish as a top coat to avoid the paint scratching off, and covered the cheap lampshades in a really lightweight floral fabric using glue.

I love the finished result and they look so much better in my bedroom now.


The dream is that, one day, my home will be so perfect that I won't be so easily distracted and won't have any desire for procrastination crafting.  Let's see how that goes...

Jenny
 x

Friday, 8 February 2013

Door sign for a little girl's bedroom

If you follow me on Twitter or know me in real life, you probably get sick of hearing all about my four year old niece.  I do talk about her a lot but that's because she's awesome, cute, clever and hilarious.  I'm currently gathering together bits for her new bedroom which I'll be decorating as soon as it's got  new flooring and central heating in place and am building up quite a little stash of pretty accessories.

I made this bunting the other week and as I had a quiet evening in when Glyn was off at a poker tournament this week, I thought I'd make a little door sign.  Although I tend to have several "big" projects on the go at any one time, I'm a huge fan of anything that can be completed in an hour or so, and this was perfect for instant craft-ification.


I had some tiny canvases knocking around that looked the perfect size so I quickly embroidered the words "Sophie's room" onto one, added a crochet flower and some crocheted picot edging, et voila!


To hang it, I got a piece of broderie anglaise style trim, folded it in half, tacked it together and stapled it to the back.


So simple, so quick, so effective!  

Jenny
x

Tuesday, 5 February 2013

French Memory Board Tutorial


I've been seeing all these gorgeous fabric-covered memory boards around for years and have always wanted one.  Laziness combined with a lack of a staple gun stopped me from making one, and an unwillingness to part with the obscene amounts of money the ones I saw in the shops were selling for prevented me from buying one.

I finally "treated" myself to a staple gun the other week and set about covering a generic cork noticeboard right away.  I love how easy these memory boards are to make, but I do not like staple guns.  The last time I used one was when a friend and I were helping a teacher to decorate a classroom wall when we were in Year 3 (It wasn't called 'Year 3' then but was so long ago that I've forgotten what it WAS called).  Staple guns are loud and a little bit scary and I don't know why I was allowed to use one of these dangerous things in infant school.  Possibly because 1980s kids were just tough.

There is no shortage of tutorials out there in Internet Land for making these, but as with everything, I tend to cut corners and make things easy for myself, so here is my tutorial for an easy and quick French Memory Board.


You will need:


 Cork noticeboard or a cheap artist's canvas (I prefer the canvas, see below!)
♥ Fabric measuring approx 6cm wider and 6cm longer than your chosen board
♥ Wadding or batting cut to a rectangle approx 1cm smaller than fabric
Ribbon or tape*
♥ Staple gun
♥ Buttons
♥ Needle and thread


* I used approx. 2.5m of ribbon for a 30x40cm board and approx 5m for a 60x40cm board, plus a little extra for hanging


1. Place wadding on floor and place board facedown on top of wadding, ensuring even border all the way around.  Snip off a triangle of wadding at each corner.  Wrap wadding round one edge of board and staple several times along the length.  Repeat on opposite board edge, keeping wadding taut.  Next, do the remaining two edges, pulling fabric as taut as you can.


2. Repeat Step 1 with the fabric.


3. Take your ribbon or tape and, starting with the piece that goes from top left corner to bottom right corner, staple into place on the back of your board.  Working outwards from the central ribbon, and ensuring each ribbon is evenly spaced, staple all the parallel ribbons into place.  Keep the ribbons pulled taut as you work.

4. Now for a little weaving.  Using an under/over weaving pattern with the existing ribbons, place your top right to bottom left ribbon in place.  Work outwards like you did with the first layer of ribbons.

5.  If your memory board is to be wall-mounted, and not just resting against a wall, staple another length of ribbon onto the back for hanging.


6. Sew a button at each ribbon intersection to ensure your pictures and cards stay in place.  If you're using canvas, you can just jab your needle right through to the back of the canvas which is quick, easy and anchors the button well.  For my first memory board, I used a cork board which meant I couldn't do this so it was a bit more awkward just sewing the button to the ribbons, fabric and wadding.


Some tutorials use drawing pins or tacks, but I prefer the look of the buttons.  I found that Broderie Anglaise style lace trim made a really pretty and reasonably priced alternative to ribbon.

I'm currently making one for my niece's bedroom with polka dot tape but she's only 4 so I'm not sure how much she'll have to display in it just yet...


I am also thinking of making one as a Mother's Day present for my mum but pre-filling it with pictures and memories of her family.


Jenny
x


Monday, 28 January 2013

Betty's Birthday Embroidery

My Gran (Betty) turned 92 the other day and I wanted to give her something handmade alongside the other gifts I'd bought her.  I usually give her jewellery I've made especially for her but as her jewellery box is overflowing these days, I thought I'd give her a little embroidery this time. 


This was a super-quick job, with the stitching completed in an evening and then the petals filled in with watered-down acrylic paint the next morning as I was in a rush to finish it!  I'd love to do something similar but with the petals entirely stitched...although I have just found two forgotten and half-finished embroideries in a cupboard, plus I've just started working on a new one tonight so that might be a while off...

My Mum, Gran and niece
Anyway, most importantly, the birthday girl loved it and had a great lunch at her favourite restaurant, surrounded by family, delicious food and copious amounts of wine!  

Jenny
x


Saturday, 5 January 2013

Freehand Bluefinch Embroidery

Woohoo! I knew calling my New Year's Resolutions 'goals' instead of 'resolutions' would pay off.  One of my 'goals' was to finish off the various craft projects I've started over the past couple of years and then abandoned.  I started a little freehand embroidery of a bluefinch (in honour of my shop, Bluefinch Boutique) in one of the very first Creatives Unite sessions way back in early 2012.  It was only a very basic outline embroidery so should have been completed in a few hours but as with so many of my projects, it got tidied up, stuffed in a carrier bag and chucked in the back of a cupboard.  There wasn't much left to do so I completed it in this week's Creatives Unite session and it now sits proudly in my bedroom, hurrah!


Even Fluffy approves...


Jenny
x

Sunday, 26 August 2012

“A Sunday well-spent brings a week of content”

OK, so that's an old proverb and not my own words but I definitely agree.  I hate mooching around the house all day on a Sunday wondering what to do and feeling that familiar Sunday night feeling creeping up on you sometime around 4pm.  Now that I'm (temporarily) back in a 9-5 job with an obscenely long commute as well as running Bluefinch Boutique, my Sundays are really precious and I try and enjoy every minute of them!

Friday night was spent having dinner, playing cards and drinking gin with friends, Saturday was early morning clothes shopping in Liverpool, a supermarket dash, DIY and housework so Sunday needed to be unwind day.

We started off our day at Brimstage Hall, an 800 year old hall which houses a range of lovely independent shops.  Recollections is a stunning shop selling a huge range of vintage crockery, furniture and gifts.  Most of the vintage china is sold in matching sets but there are a bunch of lonely cups and saucers you can buy separately and mix and match for £1.50 each.  I've seen a few people turning pretty teacups into mini plant pots so I bought this one with the intention of doing the same:


I had (and, sadly, killed) a cute little heart-shaped cactus from Ikea so I'm thinking one of them might look good in the cup?  And I'll try not to kill it this time - so much for cacti being the option for people who can't look after plants.

I'm still gathering together pictures for the gallery wall I mentioned in my last post and so far have prints from Paris, Amsterdam and Turkey which are all special places to me and my boyfriend.  I had been looking for a local print for a while and came across a great selection in The Stables Gallery .  I made Glyn make the final decision on which print to buy as apart from his guitars, games consoles and laptop, I feel like I picked out pretty much everything in our house!  He picked this one of New Brighton lighthouse in the middle of a storm:


We can see this lighthouse from the end of our road so couldn't get a much more local picture!  It's really hard to see from the photo but it's got great depth and colour.  I also bought this card which reminds me of the Rosie the Riveter posters:


After browsing the lovely shops, we sat in the sun in the courtyard with a cup of tea and lots of very friendly  hens.  


I didn't realise they were ex-battery hens until I saw a sign on the way out about them.  It's so lovely to see them clucking around, happy, healthy and safe.  I know a couple of people who've adopted ex-battery hens and think it's a wonderful thing to do.  As soon as I get bigger garden, I'm joining them!

Next, it was leisurely Sunday pub lunch with my whole family followed by a walk on the beach at sunset...


Whatever you're doing, I hope you made the most of your Sunday and that you're having a lovely Bank Holiday weekend :-)

Jenny
x

Wednesday, 22 August 2012

Song lyric embroidery

I'm currently gathering together a load of prints and pictures to complete a gallery wall in my living room and wanted to add a few bits of embroidery in there.  I've been intending to do a song lyric embroidery for a while but couldn't decide what song/line to use.

The one I've gone with for the living room wall isn't the most profound lyric and I can't say it's one which particularly speaks to me, but The Doors are one of my favourite bands ever and Light My Fire has been one of my favourite songs since I was about 12 so I thought I'd just go with it!


This embroidery only took an hour or so to do which made it the perfect project for last week's Creatives Unite (Creatives Unite is the brainchild of Anna at Miss Beatrix.  If you need a creative outlet to stay happy and help you function properly, check it out!).

I've got a couple more embroideries to finish and I need to find a couple more prints before I have enough for my gallery wall but in the meantime, I'm getting lots and lots of inspiration from Pinterest.

My first blog post in aaaaaaaaages and it's probably better suited to tumblr but thought I'd ease myself back in gently :-)

Jenny
 x


Thursday, 5 July 2012

I made a cushion!

A couple of months ago, I was having a Twitter chat with the lovely Anna and Carolyn (aka @Miss_Beatrix and @AyannaAccessory) about sewing.  Basically, we all agreed we'd like to do more of it but lacked the time, motivation and confidence.  We decided to pick a different (easy) sewing project each month which we would all have a go at and compare results at the end.  It seemed like a good way to learn new techniques and having the one-month deadline gave you motivation to finish, but also plenty of time to procrastinate.

This is the second month we've been doing this and we decided to each make a cushion. Now, bearing in mind that I'm a total sewing novice with a machine which has been in hibernation for several months (years), I'm very happy with how this turned out:


The back has a simple envelope style opening which was really easy to do and made me wonder why I'd convinced myself I'd make a mess of it.

I used this pattern/idea from the lovely Cluck Cluck Sew blog.  There are tons of other things I want to make from there now, including loads of amazing Sprocket Pillows which I'm going to attempt when my sewing confidence is a bit higher!

I'd not tried applique with a sewing machine before, only by hand, so I was pleasantly surprised by how quickly I got the hang of sewing round those little leaves.  


The first few I did were ridiculously wonky and I thought I'd have to abandon the machine and do the rest by hand, but I persevered and improved lots by the end.


The best thing about this is that it cost practically nothing to make.  All the fabrics were already in my stash, except the trunk which I cut up an old vest top for.  

I hope you like it and if you're a novice sewer and would like to join our little monthly challenges, get in touch on Twitter!

Jenny
   x

Friday, 4 May 2012

Vintage finds: Sewing box

So, apparently sewing boxes are like buses: You wait all year for one and then two come along at once...or something. I've been looking for an old wooden sewing box for ages, preferably one that could also double up as an end table/cat lookout post/footstool/mug rest but was having no luck.  Then, a couple of weeks ago, I came across one on ebay.  It was a little small, but it was only £8, local and great quality solid wood so I bought it.  It's a fixer-upper and is soon to be sanded down, painted and spruced up.

It wasn't perfect, but I'd found my sewing box so I stopped looking.  As is so often the case, once you stop looking, you find what it was you wanted.  I was visiting my parents a couple of days ago when I passed a new 2nd hand furniture shop in their village.  Lo and behold, there, sitting outside on the pavement was this:

vintage wooden sewing box table

I have heard lots of tales from more dedicated shoppers than I about the time they bought some old piece of tat and it turned out to be full of vintage treasures and oh, what a reward for trawling 2nd hand shops, you never know what you will find, blah blah blah.  That never happens to me and I suspected certain people were exaggerating the regularity of this happening.  Well, some of them might be but when I finally got round to lifting the lid of my sewing box (after impulsively telling the shop owner I'd take it), I discovered....loads of vintage treasures and oh, what a reward for trawling 2nd hand shops, you never know what you will find, blah blah blah.

This is my very favourite item of all those in the box:

I love it.  For a start, I own Bluefinch Boutique and this is a Blue-tit which is close enough for me, but also because it's just so darn pretty. As if that wasn't enough, it's is chock-full of lovely vintage buttons, like this beauty:


From scraps of paper and old envelopes in the box, I have gathered that the lady who owned my sewing box was called Eileen, and that she lived with her husband in Bootle, Liverpool for at least part of her life.  I haven't even begun to sort through the piles of accessories and supplies in her sewing box but it's obviously a collection that spans many, many years, perhaps a lifetime.  There are items going back to the  at least the 1950s but there are also much newer items. It always makes me a bit sad when I see this kind of thing to think that the owner had no-one left who shared her obvious love of sewing or who wanted to keep this little part of her life for themselves but don't worry, Eileen, it's found a good home.

Jenny
 x