Showing posts with label fabric. Show all posts

Monday, 11 February 2013

Pro-craft-ination - Lamp Makeover


As well as running my own little shop, Bluefinch Boutique, I'm a freelance writer.  I work at home from my little office or, if that's too messy, the kitchen table.  As I'm trying to expand my client base and get together a decent portfolio of writing at the moment, I sometimes have to work on briefs that may not be exactly in my area of expertise and it can take a while to think of an angle for my article.

I'm trying not to turn anything down at the moment as a) it's all experience, b) you never know which unlikely little jobs might lead to bigger and better things, and c) I have a serious addiction to bamboo yarn, I love holidays and I need a new bathroom.

I love writing and once I get started on an article, the words generally flow with ease. Before I can actually sit down and get to that point, however, I tend to procrastinate in crafty fashion.  Generally, I'll be idly looking around the house when my eyes will land on something and I'll think "Oh, I'll just quickly paint/strip/cover/mend that before I get started on the writing" and before I know it, it's 2pm and I've forgotten to have breakfast.

These ugly little lime-green lamps had been sitting in my bedroom for a few months.  I used to have two really pretty white lamps in there but somehow they both got broken.  I actually bought these as a temporary replacement at a ridiculously low price but they outstayed their welcome so, sick of waking up to them, I gave them a quick makeover:
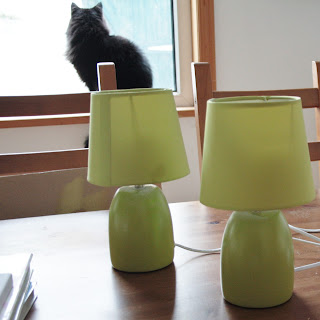
lime-green lamps....non
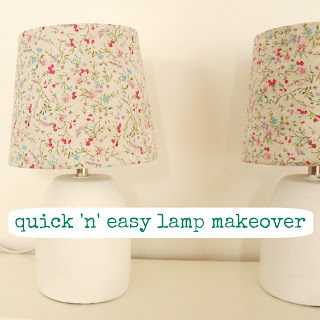
white and florals...oui
I painted the bases in white acrylic paint, adding a layer of clear varnish as a top coat to avoid the paint scratching off, and covered the cheap lampshades in a really lightweight floral fabric using glue.

I love the finished result and they look so much better in my bedroom now.


The dream is that, one day, my home will be so perfect that I won't be so easily distracted and won't have any desire for procrastination crafting.  Let's see how that goes...

Jenny
 x
Tuesday, 5 February 2013

French Memory Board Tutorial


I've been seeing all these gorgeous fabric-covered memory boards around for years and have always wanted one.  Laziness combined with a lack of a staple gun stopped me from making one, and an unwillingness to part with the obscene amounts of money the ones I saw in the shops were selling for prevented me from buying one.

I finally "treated" myself to a staple gun the other week and set about covering a generic cork noticeboard right away.  I love how easy these memory boards are to make, but I do not like staple guns.  The last time I used one was when a friend and I were helping a teacher to decorate a classroom wall when we were in Year 3 (It wasn't called 'Year 3' then but was so long ago that I've forgotten what it WAS called).  Staple guns are loud and a little bit scary and I don't know why I was allowed to use one of these dangerous things in infant school.  Possibly because 1980s kids were just tough.

There is no shortage of tutorials out there in Internet Land for making these, but as with everything, I tend to cut corners and make things easy for myself, so here is my tutorial for an easy and quick French Memory Board.


You will need:


 Cork noticeboard or a cheap artist's canvas (I prefer the canvas, see below!)
♥ Fabric measuring approx 6cm wider and 6cm longer than your chosen board
♥ Wadding or batting cut to a rectangle approx 1cm smaller than fabric
Ribbon or tape*
♥ Staple gun
♥ Buttons
♥ Needle and thread


* I used approx. 2.5m of ribbon for a 30x40cm board and approx 5m for a 60x40cm board, plus a little extra for hanging


1. Place wadding on floor and place board facedown on top of wadding, ensuring even border all the way around.  Snip off a triangle of wadding at each corner.  Wrap wadding round one edge of board and staple several times along the length.  Repeat on opposite board edge, keeping wadding taut.  Next, do the remaining two edges, pulling fabric as taut as you can.


2. Repeat Step 1 with the fabric.


3. Take your ribbon or tape and, starting with the piece that goes from top left corner to bottom right corner, staple into place on the back of your board.  Working outwards from the central ribbon, and ensuring each ribbon is evenly spaced, staple all the parallel ribbons into place.  Keep the ribbons pulled taut as you work.

4. Now for a little weaving.  Using an under/over weaving pattern with the existing ribbons, place your top right to bottom left ribbon in place.  Work outwards like you did with the first layer of ribbons.

5.  If your memory board is to be wall-mounted, and not just resting against a wall, staple another length of ribbon onto the back for hanging.


6. Sew a button at each ribbon intersection to ensure your pictures and cards stay in place.  If you're using canvas, you can just jab your needle right through to the back of the canvas which is quick, easy and anchors the button well.  For my first memory board, I used a cork board which meant I couldn't do this so it was a bit more awkward just sewing the button to the ribbons, fabric and wadding.


Some tutorials use drawing pins or tacks, but I prefer the look of the buttons.  I found that Broderie Anglaise style lace trim made a really pretty and reasonably priced alternative to ribbon.

I'm currently making one for my niece's bedroom with polka dot tape but she's only 4 so I'm not sure how much she'll have to display in it just yet...


I am also thinking of making one as a Mother's Day present for my mum but pre-filling it with pictures and memories of her family.


Jenny
x


Friday, 1 February 2013

The cutest darn fabric I ever did see

I can't even put into words how much I love this fabric. I found it entirely by chance in my local crafty emporium. It was tucked away at the top of a mountain of fabric bolts stacked almost to the ceiling and when I took it to the till, the staff ooh-ed and aah-ed over it as if they didn't even know it existed.


How cute is it? There are eight adorable little children and each one has a selection of outfits and accessories.  It's by Bluehill Fabrics and is called Aunt Lindy's Paper Dolls.  I had to buy just over 60cm of fabric to get the entire pattern repeat so each 'frame' is a little under 30cm.


I probably should have ironed it before taking pictures, but I was too excited and impatient to share it.


I think I'm going to use it to make a set of cushions, probably by mounting each 'framed' print onto a piece of cotton.  If anyone has any other suggestions on ways to use it, I'd love to hear them!

Jenny
 x