Wednesday, 30 January 2013

Crochet bunting

My little niece, Sophie, is shortly moving into a new bedroom so I've offered to decorate it.  I've been getting ideas from Pinterest and have started making a few bits and pieces ahead of painting the room in a couple of weeks.

The first thing I made was this crochet bunting.  I absolutely LOVE how it came out and I think I might have to make some for my own room now in few different colours.


You can find the pattern I used for the motifs here.  It's been modified from an original pattern published in 1893.  I used a 3.5mm hook to keep the flowers tight and neat instead of the 4mm hook the cotton yarn called for.


I strung the flowers together using a simple crochet chain.  I was going to crochet over/around the chain with single crochet to strengthen it but I don't think I really need to.  

It's a really simple pattern so would be brilliant for a crochet beginner tired of scarves and granny squares!  The motifs work up really quickly so it's a great project for a weekend. 


Jenny
x

Monday, 28 January 2013

Betty's Birthday Embroidery

My Gran (Betty) turned 92 the other day and I wanted to give her something handmade alongside the other gifts I'd bought her.  I usually give her jewellery I've made especially for her but as her jewellery box is overflowing these days, I thought I'd give her a little embroidery this time. 


This was a super-quick job, with the stitching completed in an evening and then the petals filled in with watered-down acrylic paint the next morning as I was in a rush to finish it!  I'd love to do something similar but with the petals entirely stitched...although I have just found two forgotten and half-finished embroideries in a cupboard, plus I've just started working on a new one tonight so that might be a while off...

My Mum, Gran and niece
Anyway, most importantly, the birthday girl loved it and had a great lunch at her favourite restaurant, surrounded by family, delicious food and copious amounts of wine!  

Jenny
x


Friday, 25 January 2013

Miss Beatrix's Buttons

I just had to write a quick post about the lovely handmade and hand-painted buttons I received the other day from my talented friend Anna. She makes the sweetest little buttons and as she takes custom orders, I asked if she could make me some bluefinches. Even though I'd seen a picture of them before they were sent, I still did a little "eeeeeep!" when opening the envelope!  

A family of Bluefinch buttons
Anna makes the buttons from polymer clay and then paints the intricate designs on by hand.  The attention to detail is just amazing and each button is a little work of art. (Excuse the photos - they were taken on my phone as I'm supposed to be working, oops.)

Mr Bluefinch Button
Ms Bluefinch Button
Baby Bluefinch Button!
The teeny little buttons feature my shop's logo.  I am planning on making some gloves or wristwarmers and stitching these onto the wrists.  As for the larger ones, I don't have any plans for them yet but I'm absolutely in love with them!

You can visit Anna's adorable etsy shop here: Miss Beatrix Shop .  

Jenny
  x

Vegan Suppers - Goulash and Dumplings

With snow on the ground and sub-zero temperatures outside, British winters call for warming, tasty,  filling, nutrient-packed dinners and this Goulash ticks all those boxes.  It's  also ridiculously cheap and easy to cook.


Traditional Hungarian Goulash definitely is NOT vegetarian and as much of the flavour and richness of the dish comes from the slow-cooked meat, it mightn't seem an obvious candidate for conversion to a veggie dish.  I've been cooking this recipe for years though and even a committed carnivore like my dad can't fault it. In fact, it's also one of my boyfriend's favourite meals and this is a man whose other favourites are corned-beef hash and steak and kidney pie!

I sometimes serve it without the dumplings but it's soooo much better with them.  You can add a bit of grated cheese to the dumpling mixture if desired but they're just as tasty (and remain vegan) without. 

--------------------
Vegetarian Goulash and Dumplings
Serves 4

For the goulash:
2 tbsp mild olive or sunflower oil
2 onions, roughly sliced
2 large carrots, peeled and chopped into chunky slices
1 x 400g tin chopped tomatoes
400g potatoes, peeled and cut into one-inch cubes
3/4 pint vegetable stock
1 tsp caraway seeds
1tsp smoked paprika
salt and pepper to season

For the dumplings :
75g self-raising flour
50g vegetarian suet (I use Atora Light)
2 tbsp finely chopped herbs such as chives or oregano (fresh is best but dried is fine too, just use a bit less)
generous pinch of salt
4tbsp water

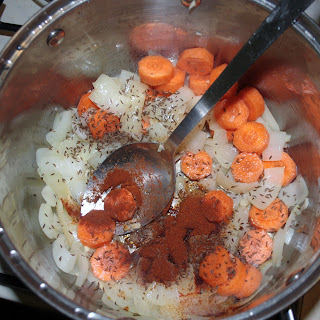
1. Heat the oil in a large pan and add the onions.  Cook over a low heat for 5-10 minutes until starting to soften.
2. Add the garlic, carrots and caraway seeds and cook for a further 10 minutes, stirring frequently.
3. Add the potatoes and paprika, stirring well.  Cook for one minute then add the tomatoes and stock. Bring to the boil, reduce heat, cover and leave to simmer for 20 minutes.
4.To make the dumplings, sift the flour into a bowl and mix in the suet, herbs and salt. Add the water, 1tbsp at a time, mixing until you have a soft, dough-like mixture.  Make 8 dumplings, either by hand, or by using two spoons to shape them.  
5.Stir the goulash thoroughly then place the dumplings gently into the pan and cover. Simmer gently for 15 minutes or until dumplings have roughly doubled in size.

Serve in bowls, seasoning with salt and black pepper if required, and enjoy :-)

--------------------


Jenny
x

Thursday, 24 January 2013

Heart to Heart


I just wanted to share a little preview of the new necklaces I've been working on for the past few days.  I can't wait to have them in the shop!

They are going to be available in gold or silver and can be personalised with any two letters. I also have some single hearts coming but I think these little double hearts are my favourite so far.

There will be a giveaway to celebrate the new designs so make sure you're following @_bluefinch_ on Twitter to be kept up to date!

Jenny
X

Tuesday, 22 January 2013

Crochet Jar Cover Candle Holders


I'm not really a candle kind of gal.  I own a few of them but I rarely light them.  I'm not sure why...possibly because if they're really nice ones received as gifts, I don't want to light them and use them all up, and because if they're not really nice ones....well, there doesn't seem much point in lighting them in the first place.

I am a fan of the humble tealight, however, so when I saw a whole load of crochet-covered-jar-tealight-holders on Pinterest, I thought 'Hey, there's a quick and easy little crochet project for me'.

This little jar only took me an hour or so (or two and a half episodes of Friends on Comedy Central, to be precise.  With it being so cold lately, I'm spending lots of time in the living room in front of the TV as it's nice and warm in there.  I've started measuring my time in TV shows.).  The entire thing is worked in single crochet, double crochet and treble crochet with a few rows worked into the back-loops only for texture. 

I can't wait to make up a few more and have a pretty arrangement of sizes, shapes and colours.  Unfortunately, I don't seem to eat a lot of food which comes in jars so I might have to wait a while to add to my collection or start collecting empty jam jars from friends like the boy from Stig of the Dump (remember that?) who used them to build Stig a window.  I think I'm going to do one with little cut-out heart motifs in it next time, wouldn't that be cute?


 Jenny
x

Friday, 18 January 2013

Pastel Crochet Granny Squares

Crochet and knitting are the perfect wintry crafts and I've really been getting back into both lately.  I've been rediscovering the humble granny square and am really enjoying making these pretty pastel ones.  Athough I started with the idea of making a throw, I quickly realised I'd better be more realistic about my staying power and make them into a cushion cover instead.  I had loads of pastel yarn left over from making gifts for the babies and children of friends and family so it started as a way of using scraps but I'm running out of pink so will need to buy some more to finish up.  Even when I start a project using leftovers, I end up spending money!


I'm just using a traditional granny pattern but with a little flower motif in the middle and a single crochet border.  I plan on crocheting them all together with white yarn and reckon I'll need 16 for one side of a cushion cover, so I'm nearly halfway there!


Kind of hoping we get snowed in this weekend so I've got the perfect excuse to stay inside in the warm and work up some more of these!

Pepe observing the snowfall


Jenny
x

Wednesday, 16 January 2013

Happy Birthday Kate


Kate Moss turns 39 today, which is vaguely depressing for me as I remember her being featured in my Smash Hits magazine when she was just 18.  I was captivated by her ethereal beauty and the fact that she was engaged to Johnny Depp, who I was besotted with after watching my friend's older sister's copy of Cry Baby repeatedly on VHS all through the summer holidays.

I actually did a project on Kate several years later for my Art GCSE (and got an A* for it, so thanks, Kate) and have always had more than a bit of a style crush on her.  Here are some of my favourite shots of Kate from over the years:


Jenny
x


Friday, 11 January 2013

Malteser Cookies Recipe

As my friends and family all know me very well, I always get lots and lots of Maltesers for Christmas and birthdays.  This is obviously brilliant, but even I have a limit as to how many Maltesers I can eat (I don't actually, that's a total lie, but I did fancy a change).  I made a Malteser Refrigerator Cake a few months ago which went down really well and I wondered if I could make Malteser cookies by adding some bashed up Maltesers to a basic cookie mix.

A quick search on Google revealed that others had gone before me and that the general consensus was that Maltesers do very nicely when incorporated into cookie mix and baked in the oven.  I adapted a basic cookie recipe and came up with the recipe below which produced 28 of these beauties:


These are by far the best cookies I've ever baked.  They're not as chocolatey as others, and not quite as sweet.  I think the dry centres of the Maltesers really takes some of the richness away, although I did make them pretty small so maybe that's the real reason I was able to eat three in one sitting.

Here is my recipe for the tastiest, chewiest, maltiest cookies:

--------------------

Malteser Cookie Recipe

Makes 20 - 30 depending on size

  • 250g buttery-style margarine or softened butter
  • 150g demerara sugar
  • Half a teaspoon vanilla extract
  • 1 free-range egg, beaten
  • 220g plain flour
  • Quarter teaspoon bicarbonate of soda
  • Pinch of salt
  • Crushed Maltesers to taste (I used about 130g)
  • 50g milk or plain chocolate chips (optional)


Pre-heat the oven to 200C/Gas Mark 6

  1. In a large bowl, beat together the butter and sugar until fluffy and well combined.
  2. Beat in the vanilla extract and egg until well combined.
  3. Add the flour, bicarbonate of soda and salt and mix well until mixture is smooth.
  4. Add the crushed Maltesers and chocolate chips (if using) and stir well until evenly distributed throughout mixture.
  5. Spoon generous dollops of mixture onto a baking sheet, leaving plenty of space around each one for spread.
  6. Bake for 8-10 minutes, or until the edges are light golden brown. Stand for a few minutes then transfer to a wire rack to cool.

--------------------

The cookies are amazing straight from the oven but will keep well for a few days in an airtight container.  Even my boyfriend, who generally doesn't have a sweet tooth, loved these cookies.  They're delicious and I will definitely be baking these again soon.

Enjoy!

Jenny
 x


Tuesday, 8 January 2013

Embroi-deer-y and a crafty giveaway!

Welcome to the first ever giveaway on my brand new blog!  The lovely people at Homecrafts recently sent me two papier mache reindeer to decorate as I pleased, along with two more to give away.  I was planning on decorating mine as reindeer and using them as festive ornaments but as they arrived right before Christmas and time was tight, I decided to make them into generic deer instead so they had year-round appeal.

I've been getting a little addicted to embroidering paper and card lately so after much dithering over how best to decorate my two cute deer, I decided embroidery was the way to go.  I painted the little deer with white acrylic paint then cut out its exact shape from sturdy card.  I doodled a little design, stitched away, glued the card to the deer, et voila:


I'm really pleased with the finished result and my little deer is now settled in his new home on my mantelpiece (which was looking very miserable and bare without its Christmassy decor).  The larger deer was going to be decoupaged but I like my embroidered one so much, I might change my mind and make him into a buddy for this one.

Here they are in their unaltered state. The larger reindeer is 25 x 22.5cm and the smaller 20 x 17cm.


Now for the giveaway...

To be in with a chance of winning a set of two reindeer to dress up to your heart's content, all you have to do is the following two things:

1. Follow this blog either via Google Friend Connect or Bloglovin'
2. Leave a comment on this post with your reindeer-decorating ideas and telling me what name you're using to follow my blog.

And that's it!  

*The winner will be chosen at random at 8pm Thursday 10th January.  The prize will be sent by First Class post, so only UK residents are eligible to enter.*

If you'd like to purchase the deer yourself, here they are on the Homecrafts website.  

Good luck :-)

Jenny
x


Saturday, 5 January 2013

Freehand Bluefinch Embroidery

Woohoo! I knew calling my New Year's Resolutions 'goals' instead of 'resolutions' would pay off.  One of my 'goals' was to finish off the various craft projects I've started over the past couple of years and then abandoned.  I started a little freehand embroidery of a bluefinch (in honour of my shop, Bluefinch Boutique) in one of the very first Creatives Unite sessions way back in early 2012.  It was only a very basic outline embroidery so should have been completed in a few hours but as with so many of my projects, it got tidied up, stuffed in a carrier bag and chucked in the back of a cupboard.  There wasn't much left to do so I completed it in this week's Creatives Unite session and it now sits proudly in my bedroom, hurrah!


Even Fluffy approves...


Jenny
x

Friday, 4 January 2013

On Safari

Not in the wilds of Kenya, sadly, but in the far more drizzly and mundane surroundings of Knowsley. That's not to be disparaging - I think Knowsley Safari Park is a great day out.  Africa it may not be, but it's certainly a lot cheaper and more accessible.

My boyfriend and I wanted to take my 4 year old niece for a day out between Christmas and New Year and, as all you parent types will already know, it's hard to find places to entertain little ones when the weather is bad, everything is closed for the winter and indoor attractions are full to bursting point already.

I'd been to Knowsley Safari Park a couple of years previously with my friends, but my boyfriend hadn't been since he was a kid so we thought we'd introduce my niece to one of the north west's staple family days out.

We somehow failed to buy a guidebook at the entrance booth (Where was the pressured selling?? Why didn't they practically force me to buy one like other tourist attractions do??) so although I was confidently able to identify the more obvious animals, such as lions, tigers, giraffes and elephants, I struggled with all the deer-type things.  'What's that?' my niece would ask. 'Ummm, it's reindeer!  Like Rudolph.  Look, he's taken his red nose off because he only wears it at Christmas.'  Then we'd drive into another clearing with a load more deer-type things. 'What's that?'.  'Umm, it's another reindeer...'. (I've since learnt that most of what I thought were reindeer were actually Pere David's Deer).

Anyway, it's a fab day out and I definitely recommend it if you're within driving distance.  I particularly enjoyed this young lion taking a shine to our wing mirror, boyfriend enjoyed this less so:


Highlights = the lions wandering up to your car, the baboons trashing your windscreen wipers, the friendly and knowledgeable staff and the sealion show in the walk-round section at the end, which is brilliant for little kids (and me - I bloody loved it.  Sealions are v clever!)